
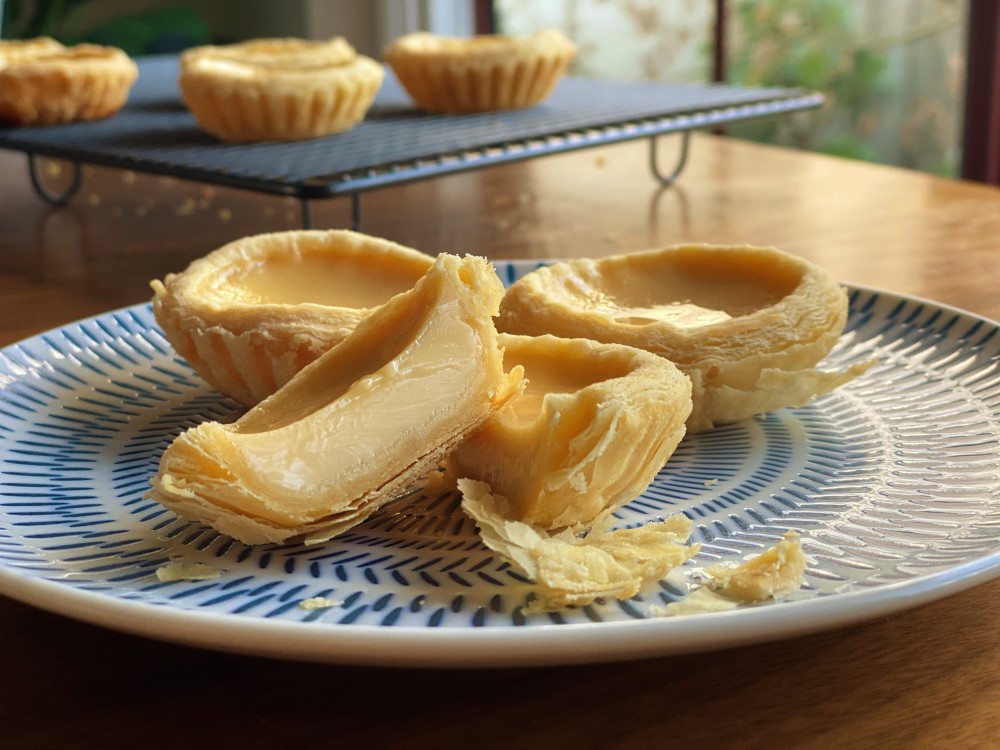
If you like Cantonese Dim Sums, you should be very familiar with these hot crispy flaky Hong Kong (HK) egg tarts. Given our Cantonese backgrounds, it was the norm for our families to regularly gather at Yum Cha restaurants for lunches. We would stuff ourselves with so many amazing dim sums and get so excited every time a trolley comes by. Dessert trolleys usually come later on, but we would specially order these egg tarts in the very beginning as we simply can’t wait! They run out quick as well! They will always be delivered almost instantly fresh out from the oven. It’s so hot, you gotta blow them a fair bit before taking your first bite, if not it’s gonna burn! It’s so good that we will gobble it up in a split of a second despite it being so hot, leaving only some fragile flakes scattered everywhere on the table and floor.

Chinese egg tarts were first inspired from English custard tarts and Portuguese pastel de nata. They eventually became greatly popularised in HK and became a traditional Chinese dessert that you will find in Cantonese Yum Cha restaurants, Chinese/Cantonese bakery stores or HK style cafes. Some of you may also have heard of Portuguese egg tarts (Po tarts) and often get confused with their difference to HK egg tarts (Daan tarts). The pastry of HK egg tarts can either be a crumbly flaky type or a buttery tasting cookie crust one. Hands down, we love the flaky ones!! As for Portuguese egg tarts, the pastry has a flakiness as well but more similar to the outer layers of a croissant. The most obvious difference is the appearance of the egg filling, where HK egg tarts have an evenly yellow smooth shiny surface, whilst Portuguese egg tarts are partially caramelized with the brown or black puffed up patches. It is the higher milk content in these tarts that creates a surface of protein film which causes the browning especially under a much higher baking temperature compared to HK egg tarts. Portuguese egg tarts also tend to have heavy cream, whilst HK egg tarts have evaporated milk. In terms of taste, Portuguese egg tarts have a creamy milky and sweeter taste, whilst HK egg tarts are the opposite, denser but less sweet.

HK egg tarts or Portuguese, either way, they both taste YUM, and most importantly, they are one of Mel’s father’s top favourite foods, which is the reason we have been working hard on this. We are so happy having finalised this recipe, and can’t wait for COVID to end, so we can finally fly back to Singapore to make him these addictive egg tarts. We have honestly gone through WAY too many of them!
It took us a tremendous amount of effort before we finally got what we were looking for. So many recipes, so many eggs and milks, but we were never fully satisfied especially with the egg filling. Before we even started, we already knew we wanted a nice flaky pastry that is not too buttery on the lips, with an egg filling that is not too sweet, not too dense and has a light creamy milkiness to it. We initially always ended up with overly dense egg tarts but with great aesthetics like HK egg tarts OR patches of browns we did not like but with a great taste and texture like Portuguese egg tarts. In the end, we decided to go somewhere in between both kinds. We also realised that adding more eggs to the filling may result in something more ‘quiche-like‘. It did take us multiple tries especially with changing oven settings and timing before we got it right. We always had to keep a close eye on them. A lot of hard work, but SO worth it!!
For this recipe, we actually recommend making the egg filling earlier on to allow the sugar to fully dissolve and the entire mixture to fully settle. If you use it too soon, you may notice voids in your egg filling. Allow plenty of time ahead to prepare the pastry. It consist of an oil dough and a water dough which will both get folded together after a 30-minute chilling in the fridge. You may either use your bare hands to knead them (we have not tried this cos we got NO muscles!), or a mixer. From our experience, the food processor was a life saviour!


After first 30 minutes, you remove both doughs, roll out the water dough enough to fully wrap and encase the oil dough. Let it chill in the fridge again for 30 minutes, after which you begin folding! You will have to fold, put in the fridge, fold again, put in the fridge, and fold AGAIN, and put in the fridge. A lot of repetition! But it’ll give you those nice puffy layers! First and second folds, you’ll need 3 layers and the last third fold, you’ll need 4 layers. Eventually, you’ll have to roll the pastry into 5mm thickness, ready for the circles to be cut out. If you don’t have egg tart molds, you can try using small muffin trays as well but they won’t have that traditional shape of the pastry.


Wrap it up well!


3 layers, chill, repeat 3 layers


4 layers
It is recommended to cut a bigger size circle to the circle size of the mold. We used stainless steel egg tart molds with a diameter of 7 cm and a cookie cutter with a diameter of 8 cm. If pastry circles get softer or ‘melting’, let them chill in the fridge for another 15-20 minutes again so that if you can mold them with ease. If you work faster, you should be able to mold them straight after cutting the circles. Press the dough against and up towards the sides and bottom, allow a bigger space for more egg filling. Poke holes on the base with a fork to let air bubbles out. Place them back in the fridge to chill again for another 20 minutes. Whilst waiting, preheat the oven to 200°C. Depending on oven type, make sure to use pastry or baking setting or more specifically, ‘Bottom Element Heat‘, so that heat comes from the bottom. This is to ensure that the pastry is uniformly cooked and egg filling does not overheat at the same time.


When ready to bake, place egg tart bases on a baking tray, and slowly pour in the egg filling into each of them to about 80-90% of the height, and remove air bubbles. You then very steadily carry the tray into the oven, and bake for 15 minutes first, then reduce temperature to 180°C, and bake for another 10 minutes. If you want a completely smooth shiny surface, you have to keep a close eye on them in the beginning. We tend to open the oven after 10 minutes to remove air bubbles again or any thin protein film layer due to the milk. Be careful, it’s hot, don’t burn yourself! If you see the egg filling dome rising too much, reduce oven temperature to 170 or 180°C. You may also open the oven door slightly to lower the temperature. So keep a close eye on them again near the end! Once done, switch off oven and keep the oven door slightly open, and let them bake in the residual heat for 10 minutes.


Finally, remove tray from oven and let egg tarts cool a bit before removing them out of the molds. They should pop out easy. If they don’t, means pastry is not fully cooked. They should always be served warm! They can be kept up to about 3 days in the fridge, NOT FREEZER. To reheat, just place them back in the oven under 200°C and bake for 5 to 8 minutes and they will be warm, crispy and flaky again!


These look wonderful!
LikeLiked by 1 person